Monday, December 31, 2007

Battery Locations


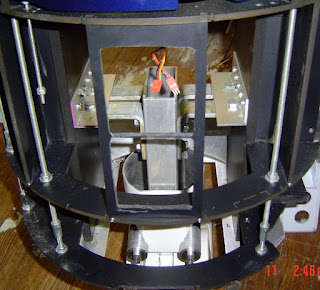
I have several locations for batteries to be mounted.

On each side of R2 under the side panels, I can mount 2-12v. batteries. 1 on each side.

On top of the center foot mount, I can mount 2-12v. batteries. This is probly where I'll mount the batteries for the 24v. scooter motors. I still have the mounts in the battery boxes, So I could mount 2 more batteries there also.

The 2 Black lights on each side of the main panel (which is removed right now) will only be used when I'm showing off the guts.

Dome Electronics


As you can see in the pic, I have used more Vex hardware inside the dome. I will add more flat panels, So the entire top is closed.
Below the flat panels is where the Slipring will transfer main power.
The power strips I will change to a smaller version.
So far, everything in the dome is 12v. execpt the Holo - 9v. and the rear logic 24v.
The rear Logic, I will controll the 12v LED board with the 12ch, But the power to the main board will have to be direct from the 24v. batteries.
The 12ch. has more than enough controlls for the dome and the Vex will work with the 12ch. to controll the Periscope, Servo for the front Holo,
and the 4 servos for the Pie Panels.
Wiring from the electronics to the actual dome,
I will add power connectors so I can disconnect the dome and sit it to the side if I need to get inside.

Sunday, December 30, 2007

12 Ch. Remote

Here's my 1st attempt to getting the dome going.

I used the 12 ch. Remote from Ebay to turn on the lights and it will also tie into the Vex to control the periscope and other items in the dome.

When I press button #1 - I can turn the PSI's on/off , Press button #2 - turns the small logics on/off , Press button #3 - triggers the Builders Club display , Press button #4 - turns Holo on/off.

And I still have more options. Once I get everything figured out, I'll disconnect the little beeping speaker on the 12 ch.

Thursday, December 27, 2007

New PSI's

This is the New PSI's that Mike V. offered to the group and these things are AWESOME!!!

I should have took a pic before I installed them to show how he made them. But they're round PC boards with the LEDs built right in the board and they control front and rear PSI's.

They also have a jumper that controls the LEDs, It sets it for Flash, Fade or both at the same time. I'll post a video of the back as soon as I get it installed.

Tuesday, December 25, 2007

Vex vs 12 Channel Remote

This is an idea I was trying to explain about this 12 Ch. On my R2, There are simple things I need to control by remote.
1. Raising/lowering Periscope
2. Turning various lights on/off
3. Rotating front Holo
4. Changing display on Front Logics
5. Maybe Open/Close Pie Panels
6. Etc.
I experimented with my Vex and hoped not to burn it up and I was in luck. I ran a servo cable from the remote Ch. 1 into Dig. I/O 6 I set the Ch. 1 on the remote to toggle on/off. This allows me to turn a motor on/off.
Now that I know I can wire thing this way, I can set up the Vex and the 12 Ch. remote to activate items in the dome.
Somethings will not need to pass through the Vex as the 12 Ch. can handle things by itself. This may not be a GREAT deal for some that know coding, But for me its an AWESOME project.

Sunday, December 23, 2007

Vex Work

I started back on my Vex setup and went with a very basic code for right now.
Chris James knows away to code 2 Vex and use 1 controller. I need to contact him and see if this is something I can figure out and I may go this route.
This would make it nice to run the body off 1 Vex and the dome off another Vex.

I went to Radio Shack and bought a battery connector, So I can run the Vex off a 12v. battery with a Universal power supply. The supply allows me to convert the 12v. down to 7.5v.
I did this because I'm trying to eliminate so many different batteries in R2.

Sunday, December 09, 2007

Slow time Again

I haven't done much the last few days, But I'm helping my wife get her R3 further along.
Also, The Walgreen's lights did work and look wonderful, But you need a solid dome not a clear dome to hide all the extra wire.

It is a very good idea from 1 of the other builders, But won't work for her dome.

I've had some CRAPPY luck here lately, Between being in the Hospital and our car's
head gasket went out.
So I might not have allot of progress to post.

Wednesday, November 28, 2007

Wife's Front Logics

I wanted to post this here, Because it's so cheap to build and I really like it.
The lights are battery operated and it will take 3 strands per logic.
For $15.00 per logic it sure beat the price I paid for mine.
The Vid is short and not that great, But you'll get the idea.
Once I get the Logics finished, I'll post another video.

Tuesday, November 27, 2007

Booster Painting


I painted 1 Booster today, Yeah BIG PROGRESS!!!

Anyway, It's showing some orange peel but I think when it dries it will be better.

I tried to leave the Aluminum showing where it's suppose to show the 1st time,

But it looked terrible, So I clean the booster and painted again. I'll have to hand paint the areas that need to be silver. :(

Wednesday, November 21, 2007

Remounting the Legs Update


These pics show the steps I went through to bolt on my wood legs.
I also changed the A&A leg mounts, You can see the different arrangement in the pics. I did this because, I was getting some slack in the legs and that's a No No.
The A&A leg circles mount inside the large aluminum ring and I also shimmed the circles with some nylon shims.
They're the white parts.
Next I bolted this area down tight, So there would be no slack.
Next I used a large washer between the frame mounts and the legs. This will provide a solid surface for the legs to mount.
Again I added more nylon shims to the leg. This goes through the frame to the inside. This also takes up any slack and allows the legs to position into the right spot.
The last 2 pics show the nylon spacer coming through the frame and again I bolted this with a large washer then a small washer and a lock nut.
I will get the legs into the right position and then I will put 2 screws into each of the large washer on the inside. This will keep the legs from moving, Since I'm not doing the 2-3-2.
P.S.
I did'nt show a pic of the outter A&A frame mount that bolts on top of the A&A circles.
But it must go on or you will have allot of slack in the legs.


Sunday, November 18, 2007

Remounting the Legs


Here's the A&A mount assy.

Now I'm not sure if this is the way Andy has designed the mount to fit, But this is how it works best for me. After you bolt the ring and circle to the frame , You mount the outer blocking to the frame.

I guess you noticed I got the inner circle mounted wrong, So I'll have to pull it apart and turn the inner circle so the slots Aline correctly. This is a must, But I'm not feeling my best today and wanted to show the mount process.

I'll post more pics about this soon.

Friday, November 16, 2007

Allmost a Disaster

Ok, I've posted this before on my blog for people to always check back for changes I've made building R2. And luckily Brian questioned how I was attaching my wood legs to the A&A frame.
(Thanks Brian)
I found a flaw and have corrected it and R2 probably weighs about 20lbs. lighter and much stronger at the shoulders.
The satellite motors I was using in the frame only allows for shallow bolts, Even though I tapped them for larger bolts.
So, I removed the Sats. out of my frame and used the A&A shoulder mounts.
There was still allot of shimming inside this area, But I am confident this will hold.
If R2's shoulder bolts would have backed out, I would be back to square one and a damaged R2.
I'll post pics of the change this Sunday and I recommend everyone to stay away from the Sats.
Not only have they failed doing the 2-3-2, They are just not a strong way to mount the legs.

Sunday, November 11, 2007

OMG!!! He's Standing


It's been a long 2 years to get to this point and I have allot to do, But he's standing for the


1st time and I'm so HAPPY!!!


Center Ankle Mounts


Here's how I mounted my Center Ankle.
I built it pretty strong for 2 reasons.
I wanted it to handle more than enough weight and It also adds strength to the A&A frame.

Wednesday, November 07, 2007

Leg Process


I just wanted to show the way I applied the Styrene to the wood legs.
I used Contact Cement and you wipe down both parts and wait 5 minutes then bond the 2 together. I left quite a bit of overlay, But all you have to do is use a Dremel to cut it down to size.
Once you have it cut closer to the leg, I used my sander to get it to the correct size.
The process is very easy and it leaves a nice finished edge around the wood leg.

Tuesday, November 06, 2007

A little more info on the Speeder

One more (off topic) thing, about the COKE ONE Landspeeder that has been listed for sale. It was built in Atlanta in about 1982, I was the person who was responsible for driving it for the Coca-Cola Company there, as well as the Cobot Coke Robot.Typically, I trailered it wherever it would go, for parades, store openings, etc. However, it WAS street legal, and had a GA license plate on it, and I personally drove it on a regular basis over a three year period. It was built by Bill Tolar, on a Volkswagon Beetle chassis, and was the scariest F'ing thing I've ever driven on the freeway.....bugs in teeth and all.Bill and his crew also built a second one from the same molds that became a river raft, and it did finish the now defunct "Great Chattahoochie Raft Race". The last time that I spoke to Bill, he still had the raft in storage in his warehouse. The speeder is MUCH larger than the original, and is way out of scale, but was still a real eye catcher in it's day.

Now I can't reveal who this info came from, But it is a member of the R2 Builders Group.

Sunday, November 04, 2007

Local Find


Here's something you don't see everyday, It's the old Coke-Cola Land speeder.
I read an article about 1 month ago and it was somewhere down south in Florida.
The article read, The Land speeder was impounded and 1 of the officers decided to auction it off for charity. So I guess it made it here.
Looks to me it was built on top of a VW frame and it was street legal.

Saturday, November 03, 2007

Trial Fitting Legs


We Trial fitted the legs today and it's not going bad.
Still got allot of work to do and allot of painting, But it
was nice to see him with legs.
You can see the 1 leg still needs the Styrene and we had a couple of problems with the A&A inner circles that are inside the large spacer that is in between the body and the leg.
But all I need to do is sand it A&A circles for a better fit.

Sunday, October 28, 2007

Legs Almost


Well, I got 1 leg almost together. There's still allot of work to be done and painting.
My wife volunteered her A&A motor holders so I could get R2 standing soon.
I'll replace these for her R3 soon.
Those two holes on the back of the leg hold the Booster in place and I'll get a white cover for them.
Now if I can get the other leg this far, I can see R2 stand for the first time.
More to come soon.

Wednesday, October 24, 2007

ANKLES!!!!!!!


My Jag Ankles arrived today and I slid the parts together to see how they look.
Can't wait to get everything painted and complete.
More to come soon.

Saturday, October 20, 2007

501st Meeting


1st, I want to Thank Redeye for inviting us to the meeting.
We had a wonderful time and it was very interesting learning about Trooper outfits.
After R2 is finished and I build my Landspeeder, I will then build a Trooper outfit.
Some of the people there, I remember from the Comic book meet and was glad to see them again. See you guys next time and maybe I'll have R2 finished.

Wednesday, October 17, 2007

Getting Better


The pics show the face I put on the legs and the pocket holes.
The pocket holes are not to spec, But it was the best I could do with what I had to work with as far as tools.
I put the Shim and Booster on the leg to show what it will look like after I finish it.
I'll have to do some putty work here and there to make the legs as smooth as possible.
I attached the leg to R2 to see what he looks like with 1 leg so far.
I've still got the skin the back of this leg, But I want to stop on this leg, So I can start on the other.


Monday, October 15, 2007

Leg Skinning


I started applying the Styrene to the wood legs today and it's starting to look much better.
I had almost gave up on the legs, But Johnathan gave me a good talking too and now I'm back at my work. Once I get the legs completely covered you won't know the legs are wood.
I'll post more pics soon.

Sunday, October 14, 2007

Southern R2 Meet

I just want to Thank everyone for making this meeting WONDERFUL !!!!!
I had a GREAT time and I hope you enjoyed the BBQ and all the other goodies
that were brought to the meeting.
Next year I plan to host another meeting and it will be even bigger and better than
this meeting. I hope to invite the general public to the next meet and mix a show/meeting
together. We'll have a bigger building and will combine the local Comic book stores in with our meet to attract the public.
So, Shine up your droids and prepare for even more fun!!!

Some Short Vids

Yep More Pics


More Pics