Sunday, March 30, 2008

Small Lifter Update


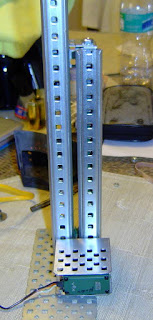
Not much to show, But I thought I'd show the changes made to the drive.

I had to drill the holes larger where the threaded rod is sitting at temporarily. I have them there to give me a visual of where the smooth rods will sit.

Drilling the holes larger gave me the means to adjust the rods. I will also be adding 1 threaded rod as the drive in the open area. I had planned on using 2 of the 4 rods for a drive, But that's not working out.

From the new drive rod, There will be a small plate added under the X plate as a hoist to lift the X plate.

I need more parts and this will slow me down for a few days until I get them.

Saturday, March 29, 2008

New Lifter System


After my Failed attempt to build a Vex type lift, I started building again.
The Vex system gained way too much weight, So I dropped the idea.
The new system I'm working on now is taking much longer to build and I'm watching the weight this time. The pics show the base under the X plate. This will be for mounting the drive to something attached to the dome ring and will also have a drive motor attached to the open area.
The X is where the Periscope will be bolted and you can see I reduced as much weight as I could and that's why it looks like an X. If I can find a threaded type rod I like, I will have 2 threaded rods across from each other as to even the force needed to lift the Periscope.
The 2 steel rods are there for support and keeping the drive smooth. You can see from the other pics, I'm really cutting this one close. As the Periscope will have just enough room not to hit the rods. The last pic shows a belt drive pulley I took from a Garge Door Opener. Althought it's to big for what I need, It gives the idea of where I'm going with this drive.

Thursday, March 27, 2008

Lifter Video

Here's a small video of the system at work. The only thing I don't like about it so far is the noisy Vex motor.

Periscope Lifter


I just started building my Vex lifting device. This is the real rough stage of the build, But it will give you the idea of what I'm building. In the pics you can see the gearing and the Vex motor assy. along with the 2 slides that control movement. Now, I will have to cut the slides down to the correct length to fit inside the dome. I took a rough measurement inside the dome and it looks like I have about 10/11 inches to play with and so far this assy. is only 8 inches. I'm not sure how much lift is needed for the periscope, But it looks like the periscope is about 6 1/2 inches long. Once I get all the bugs worked out this should make a nice system. More to come.

Sunday, March 23, 2008

Utility Arm Motors


Sorry the pics aren't that great, But it will show where and how this works. The Vex motor will push the slide system back/forward and this will be connected to the rod that is connected to the arm. All I need is a rod pivot to connect the arm rod to the slide. The sldie is very smooth and stable. The gearing is fairly quite and I'm happy with this. Once I get this completed, All you will see is the small rod in the arm area and I'll paint it to hide it from view.

Dome Drive Motor update

The drive assy. works, But the motor does not have enough power to turn the dome.
You would think it would be strong enough since a small Vex motor spins the dome with
no problem. It's just the Vex motor makes so much noise that I can't go that route.
If the noise is not an issue with someone else, Then the setup will work fine.
Here's a link to the next motor I will be trying. Other builders have used this motor
so I'm sure there's enough power in this one. Just got to redesign my setup.

Saturday, March 22, 2008

Center Foot Casters


I'm following Jerry C's idea on the caster system.

I need to order the wheels that will be used in place of these hard plastic wheels.


I bought the casters from Home Depot and they're pretty nice and smooth turning.

Dome Drive Motor


Here's the motor I plan to use for my Dome drive.

I robbed it from the Satellite motor assy. It has more than enough power t o do the job. And you can see my shaft adapter that will connect to the angle drive in the previous post.


Thursday, March 20, 2008

Dome Drive System

Here's 2 pics and a video of how I'm building my dome drive system. In the pics you can see how the setup looks. And mounted in the body you can see the short shaft that will have a motor I removed from the Satellite motors assy. I did this because I'm trying to save all available room in the chest cavity for other goodies. I know this assy looks flimsy, But Vex gears and components have not let me down yet. If you watch the video, You can see the shaft turning and that's where the motor will connect. I just need some more parts.


Tuesday, March 18, 2008

Charge Port Leds

Here's a video of the leds in the Charge port working. I used a Carl's Pic Flasher to make the leds flash. Once I get the front skins complete, I'll mount it in R2.

Now, Mine is not the same as Chris J's but it will do the trick. Chris' has allot of electronics in the background and his charge system is AWESOME. This is 1 of the Secrets I was going to install, But I was beat to the draw. Soon I will be working on some of the other ideas I have and more action will be incorperated into my R2.

Monday, March 17, 2008

Vex Goodies


Got some goodies today!!!

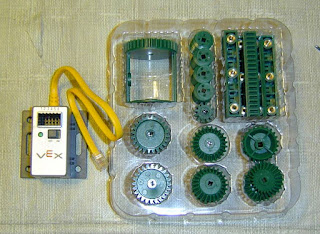
In the pic you can see the small Vex controller and the gear set I ordered. The small Vex will allow me to control some items that I don't need to be fancy like the Vex Micro.

In the video you can see the start of my Utility Arm servo. This will be hidden in the body and a small rod will be attached. As the assembly moves forward it will move the arms in/out. I've got allot of tuning to get it right, But it's a start.

Saturday, March 15, 2008

More Charger Port


The Leds finally came in and I had Brenda set these for me in the fixture. I shake to much to get these into the correct position.

But we now have 5 rows of red and the red and green in the top right corner.

My charge port is alittle offset, But it was the best I could do.

Once the flashers come in, I'll wire this thing up and post a small video of them working.

Monday, March 10, 2008

MegaCon Trip

Our trip to MegaCon in Orlando was GREAT!!!!
Keith and Carolyn meet us there and made our trip even more fun.
The Con was packed full and the 501st was there and everyone really enjoyed them.
Doug Dixon had his R2 running around and the crowd went crazy. Next year Brenda and I will have our R2 and R3 up and running and will make our 1st big show.
There's more pics of the Con on Brenda's site www.r3t7.blogspot.com
Now I will return to working on R2 even harder than I have been.

MegaCon Video

Here's a smal video of the Con.

Wednesday, March 05, 2008

Easy Door Hang

Just to let everyone know, I use 3m doublesided foam tape to install the hinges on my doors.
I use this because, Sometimes it takes several trys to get the hinge set correctly.
The only down fall to the tape is it tends to let the door sag, But there's a solution for this problem. After you get the hinge set, Tape the door closed and around the hinge apply
Amazing Goop. This stuff dries clear and really has a strong holding power.
Now the hinges can not sag or release from the skins.

Tuesday, March 04, 2008

Random Work


I'm starting to jump around on different parts. As 1 part dries from painting and modding another item, I'm moving around a bit. I finally got my other Booster painted - Added a back brace to the Battery Plate - Hinged the door over the CPU Arm.


Sunday, March 02, 2008

Led Video

Here's a short video of the Walgreen Leds.
If I can get more of these leds and the Carl's flasher, I think it will turn out nice.

Power Port Leds


Today, I started drilling the holes for the Leds to fit. I made the matix 4x5 (20 leds), They will all be red and will flash in this seq:

Center line - 2 lines out - 2 lines on the outter edge horizontal. The large hole is for the power plug and there will posibly be a green and red led in the top right corner.

The leds fit the holes perfect and the thinkness of the aluminum is correct for the leds to stick out very little. This gives me a flush design.

The electronics to do the flashing, I'm not sure what I'll use. Maybe a Carl's board can handle this seq. Now to sand, prime and install this project.

Saturday, March 01, 2008

Power Port


This is the start of my Power Port that goes behind the small hinged door.
The plug I'm using is the same kind found on Currie Scooters. I allready had the 24v. chargers, So I decided to put them to work.
I will attach this aluminum bay to the back of the skins and add a plug to disconnect it if I need to remove the skins.