Saturday, March 31, 2007

Leg Work 3


Still on the 1st leg and I'm at a standstill.

I searched around town for a 3-3/8 holesaw and no one had 1 in stock, So it was off to the internet and the going price was around $50.00.

Luckly, Someone on Ebay had 1 for 10.00, So as soon as it gets here I can continue work.

I also had a problem getting a 1/4 board, So I had to use 1/2 Birch. That puts me about 1/8 over the blueprints. I think I'll be OK cause I noticed that the legs are shimmed when the are inserted into Jag's Ankles. Once I get back to this, I'll get the bondo and catch the low spots for a nice finish.

Wednesday, March 28, 2007

Leg Work 2


I got the 1st 2 boards cut to shape and it was'nt too bad.

I will have to add the 3/4 board as a face instead of sandwiched between the 2 boards, The reason for this is: The hub is deep and I will cut the circle for it to fit through the 1/4 and through the 3/4 and a small amount will have to be cut into the last 3/4.

Finding this problem, I will have to cut a Aluminum flat circle to insert into the leg for added support where it bolts to the body. I also found that the thickness of the leg is slightly smaller than what the blueprints show. :(

Anyway, I sat my goodies on the leg so I can see my progress.

Tuesday, March 27, 2007

Leg Work


Ok, I just can't got the $500.00 for the Aluminum Legs.

So here's the route I'll have to take.

I pencil marked the measurements on wood, The wood will be in 3 layers. The front and back panels will be made from 3/4 and a center piece will be 1/4, Total thickness will be 1-3/4.

Once I cut the 3 panels, I will glue them together and also steel pin them in certain spots.

So here's the 1st pics of my future DISASTER!!!!

Monday, March 26, 2007

Radar Eye


Got the Eye painted, But I can't set it yet.

The paint is still soft and I don't want to get fingerprints in the paint.

Once it dries, I'll be able to to set and give it the 1st wax job. Once it's waxed that dark luster will appear and it looks alot different.

Tuesday, March 20, 2007

Foot Work


Now that the crunch of the Southern meeting is over, I have time to work on other things.
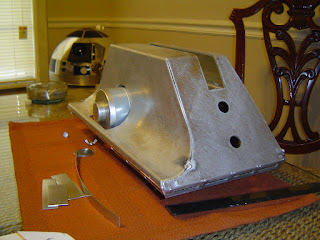
The Krider Budjet foot shells are a pain in the butt. Also the channel aluminum I have is too short, So I'll have to get some more.
Once I get everything fitted, I'll get the feet fully welded and then I'll start to fit the Battery Boxes.
R2 was watching in the background as I worked on his new means of transportation.

Sunday, March 18, 2007

Southern Meet

This meeting was AWESOME!!!
Daniel's house is huge and was the perfect spot for this meet.
There was more people this time and alot of ideas changed hands.
It was nice to see some Newbie's getting started on their R2's.
Seems like the Southern Group is starting to grow and it makes
more interesting and new ideas are flowing like water.

More Pics


Southern R2 Meet


Friday, March 16, 2007

Starting to Look like R2


Here's my most resent Pic.


Still got to paint the eye and other things.

Thursday, March 15, 2007

Rear Logics Working

I was'nt sure if I could get this thing to work, But it turned out nice.
The Led board is 1 of Leon's and the Pic board is from Carl's Electronics.
Both boards had to be assymbled and my soldering is not that great,
But I made it through the process.
Here's a short Video of how it works.
http://s71.photobucket.com/albums/i124/ctx3201/?action=view&current=MOV01739.flv

Sunday, March 11, 2007

Rear Logic Panel & PSI


The PSI area turned out pretty nice once I got the Frame area it.
The rear Logic, Could have turned out alittle better.
Some of the indents showed up, But that's about the best I could do.
Now I have some lose pieces to get painted and the paint process is over.

Saturday, March 10, 2007

Main Eye


Also got the Eye primed today, So it won't be long and the Blue will be layed.


The only thing I'm worried about painting the eye is, It has so many curves


and painting something like that tends to run very easy.


I also picked up some Felt Pads for the Holos.


This will restrict some of the movement, So they can be positioned and they'll stay there.


More Painting


I got the area around the rear PSI painted today.

I won't be able to put the picture frame Aluminum piece around it until it dries.

I also hit the Jackpot on paint today, 6-cans and they were on sale for $3.00 each.

Tuesday, March 06, 2007

PSI Building Again


Here's the lens I used in the PSI light.

I had to order the Light Kit from Walmart Online, It was $20.00 plus shipping.

So this makes this lens kinda expensive, But it does a great job with the LEDS.

The light kit is made by Schwinn and they have several models, The one I used is model #SW531 and it fits perfect in the 1-1/2 PVC pipe.

The back of the lens, You will have to cut the part off where the original bulb

mounted. This makes the LEDS fit in alittle futher and gives more light to the PSI.

Rear Logic Panel


I worked on this some more and I'm ready now for the final primer.

Once this dries, I'll paint this area and then I'll install the rear Holo.

I also need to paint the area around the rear PSI.

Saturday, March 03, 2007

Holo Mounting


I got another Holo mounted and I set up the light inside the Holo.

I decided that the Holos would remain unpainted.

The reason I did this, I spent 2 hours researching every Pic I could find
that showed the difference in the colors. I found plenty of blue pics and I sat and look at them over and over.
The more I looked at the blue the more I started to not like the look.

So this is how it turned out.